Art Hinging Tape: The Good, the Bad, and the Ugly
Let’s say you discovered a fragile black-and-white photograph of your great-great-grandfather in the attic. Or you scored a limited-edition print at last Saturday’s flea market. Maybe you created an amazing watercolor or photograph — one of your favorites ever. Whatever the case, if you want to preserve and prolong the life of precious and unique artworks, you’ll want to frame them in a sound, archival way.
Conservation-style framing uses materials which minimize the artwork’s deterioration by environmental factors. The benefit of hinge mounting is that it’s considered an archival method of mounting artwork — but only if you’re using proper acid-free hinging tape. These specialty tapes adhere art to the mounting board without touching the face of the art. They also have a forgivable “reversibility” quality that allows you to peel the tape off your art without harming it.
With hinge mounting, you’re using strips of tape that serve as “hinges” connecting the art to the mount board. A subgroup of hinging tape is hinging tissue. The latter is thinner and more transparent than tape and is best used with translucent or super lightweight artwork.
Below I outline the three most common ways to mount your artwork onto a backer board in an archival, conservation-style way using hinging tape. They’re simple-yet-genius processes that I’m sure you’ll embrace once you try them. Later on, I break down “good, bad, and ugly” methods of mounting artwork.
3 Types of Hinges for Mounting Artwork
1. Pendant Hinge
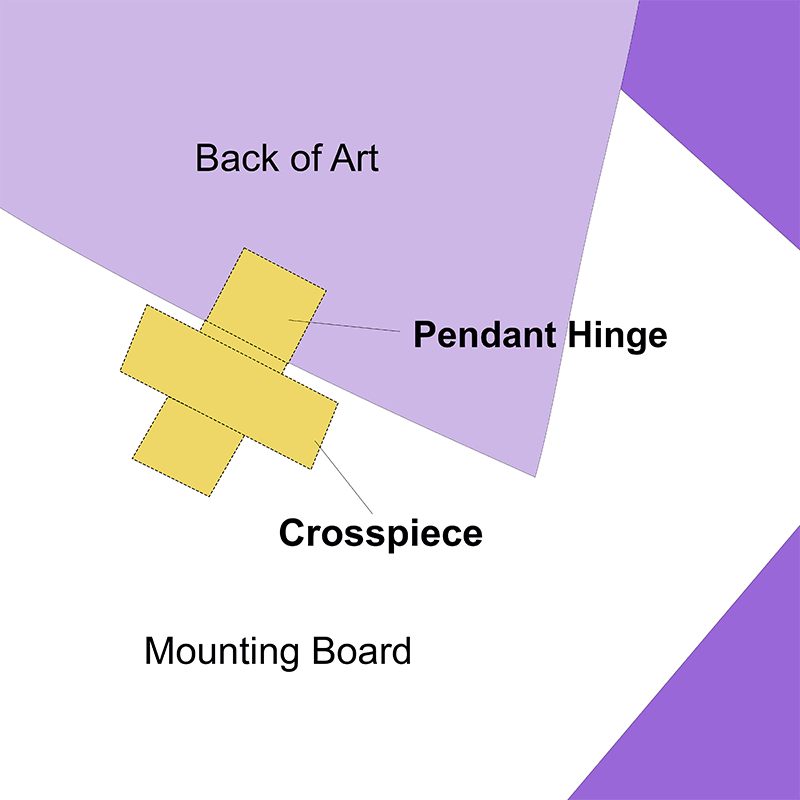
This is a common hinge made by attaching a strip of hinging tape or tissue paper to the top of the artwork, adhering the upper half of the strip to the mounting board. This hinge assumes that you’re using a mat; otherwise, it will be visible. I always hinge the left and right sides of the art — plus the middle if it’s a wide image. Plan your placement before you attach the tape. The visual below is an example of how to use pendant hinges.

2. T-Hinge
The T-hinge is a variant of the pendant hinge where you attach a crosspiece of tape over the initial hinge, providing greater stability when you are mounting heavier art such as collages, fiber art, or heavy watercolor paper. See example below.

3. V-Hinge
Used in preservation framing, a V-hinge is a strip of hinging tape or tissue that’s pre-folded lengthwise. One side is applied to the back side of the artwork. The other half is then applied to the mounting board. If the artwork is executed on a heavy substrate, such as 300-pound watercolor paper, use a crosspiece for greater stability. The beauty of this hinge is how it’s hidden behind the art, so you can frame the image without a mat board, reducing your framing costs. The illustration below shows how it works.

Sometimes customers ask me: “Good grief, Joely, can’t I just attach the artwork to the back of the mat board with whatever adhesive is handy?” Yes, you certainly can. However, if the mat board gets damaged during framing, or if a customer decides they want a different mat, you’ll have to remove it and start over, possibly risking damage to the artwork.
The Good - Archival Quality Hinging Tape
By “good” I’m referring to archival-quality hinges that won’t introduce acid that can discolor your artwork.

We sell a variety of products that fit into the “good” category, including Lineco’s Self-Adhesive Hinging Tape and Self-Adhesive Hinging Tissue. Both use a pressure-sensitive acrylic adhesive that is considered archival quality. The latter is my go-to product for making hinges for my own artwork because it’s easy to cut and handle.
If you want to try your hand at pro-level artwork mounting or you have artwork executed on a heavy substrate, try Lineco’s Gummed Linen Hinging Tape or Gummed Paper Hinging Tape. Both are made for heavier prints and artwork. They use a water-activated adhesive made with carbohydrate and protein, which features a neutral pH and is deemed safe for photos and fine art.
In addition, I suggest using an acid-free mount board as the attachment base. There are several types available including Acid Free 3/16” and 1/8” foam board, Artcare foam, and Uncut Blanks of 2-Ply AlphaRag.
Geeking Out: Are you a techie by nature and love the thought of delving deep into the chemical and mechanical aspects of framing? If so, check out The Mounting and Laminating Handbook by Chris A. Paschke. This guide, written by a picture-framing expert, thoroughly details all aspects of mounting artwork and the reasons behind them. I have taken a few of Chris’s workshops in person and she knows more about framing than ALL the larger POD and frame-it-and-ship-it shops on the Internet combined!
The Bad and the Ugly
Over the years, I’ve encountered many less-than-stellar mounting jobs. Can I say just it? Some were a hot mess! As such, I feel like it’s important to mention a few “don’t-do-this-if-you-care-about-presentation” suggestions.

Not Just Any Old Tape Will Do
Run-of-the-mill office tape, masking tape, and duct tape are made for household uses like wrapping presents, creating science projects, or fixing your leaking toilet. These are incredibly useful products — just not for framing your priceless photos and art. They aren’t designed for it.
Most of these everyday tapes should never be called upon in picture framing. The adhesives used in these products vary, but they usually contain synthetic or natural rubber and rubber-based adhesives which can become yellow, oily, and sticky as they age, damaging the artwork along the way. It’s not pretty, my friends.
Acrylic adhesives (like hinging tapes) are much more stable over time, and do not significantly discolor art and photos.
Other Photo Mounting Methods You Should Dump
- Hinging the artwork on all four sides. Think of art as a living object that is executed, at least in part, onto or with organic ingredients. As such, it requires the freedom to expand and contract with temperature changes. Proper mounting — hinging at the top of the artwork only — allows the bottom of the art to float freely and expand/contract with normal temperature changes in a home. Taping it on all four sides basically “traps” the art, which will almost certainly cause it to warp.
- Stapling artwork to the backer board. Putting holes in your original artwork is never a good idea, and the metal in the staples can potentially discolor your image.
- Using cardboard as backer board. Although carboard is readily available, convenience is not a long-range benefit. Cardboard will leak acids into your artwork and discolor it as quickly as six months after framing.
Your Future Hinges on This Tape
Okay, that’s an overstatement. But the future of your mounted art really does. If you’ve come this far with this article, you obviously care about presentation and protecting your art for the long haul. Good on you. If you have any questions about the products and hinging methods mentioned here, don’t hesitate to reach out to our Frame Destination team. We’re here for you and your art!
Last Updated September 12, 2023
Written by Joely Rogers
 Joely C. Rogers is an artist/illustrator and writer living in the mountains of western North Carolina. She has professional training in both natural science illustration and the culinary arts, as well as graduate academic training in education, sociolinguistics, and folklore/storytelling. She is a Blue Ridge Naturalist candidate with the North Carolina Arboretum and a member of the Guild of Natural Science Illustrators.